Java-The-Ultimate-Tutorial-To-Get-You-Started
Java ULTIMATE Tutorial
By: @EpicGamer007 !!!!
I am sure that there are many people who want to learn java either for class or to learn something new so I have created this LOOOOOONG tutorial.
We assume you have already programmed before so we will not be going over wHaT iS pRoGrAmMiNg and questions like that.
Unit 1 - Basics
Okay first topic:
What is Java and why use Java?
Java is a general purpose programming language which is an Object Oriented Programming Language and class based language. It was created by James Gosling at Sun Microsystems(which was later acquired by oracle) who wanted to create a programming language in which developers can write once, run anywhere. And it is a genius design. You can write code on a windows OS machine, then you could run that code on almost any other platform(with a VM) without making any changes. In the 1990s and even now, many languages are not platform independent. Languages like C and C++ need to have their code changed quite a bit if you want the program to be run on another platform.
There are so many versions of Java, which one should I use?
- The latest version is Java 15 but It is not a LTS version so I do not recommend that
- Repl runs Java 8 a as well as 11, These are LTS versions. Java 8’s last free public update was in January 2019 but you can use Java 8 because it is a good standard.
- I suggest Java 11 because it is the latest LTS release and it will continue to get updates at least for a few months.
But who uses Java?
- Android - Most android applications are made in Java or at least use some java if they are not pure Kotlin.
- Minecraft(The good version of Minecraft)
- Many IDE’s are made in Java, Eclipse, Intellij, and Netbeans all use Java
- According to this site, Intel, T-Mobile
- It plays a part in the E-Commerce and Banking Industry
- Big companies still use Java, Google, Uber, Amazon…
- Many companies use it for backend
Bad parts of Java
- Strictly Object Oriented, no such thing as global methods or methods without an Object
- Some security vulnerabilities
- No support for pointers/Some low level things
But isn’t java “dying”?
Well.. OF COURSE NOT. Java is still heavily used by colleges, and tech companies. As said earlier, Google, Amazon they use java.
What languages are similar to java?
In terms of syntax:
C++ C C#
Pretty much all the curly brace languages
In terms of usage
Python JavaScript(node) C#
In terms of almost everything
C#
Now that we went over the basics, lets get into programming!
Here is a Hello World Project
public class Main{

	public static void main(String[] args){
		System.out.println("Hello World");
	}

}
So what is this program doing?
We first create a class, which will be called Main. All java code has to be a in a class
Then we create the public static void main(String[] args) method, this is the main methods from where the whole program is run from. If you don’t have this, nothing will run. Then we use System.out.println("Hello World") which then prints what ever is inside the “”. We finally add a ; because every statement in java ends with a ; Now we ask the question, how do we run it? The way you run a java program is to first type in to the console javac Main.java. Then it compiles, depending on how fast your computer is, it may take a long time or little. After that, it will create a file called Main.class, this file is the file you run. Type in java Main, then you should see Hello World in the console. And there you have it, your first java Program!(If you are using repl or an IDE, You only have to press the run button in it and it will do it all for you).
Also, if you did not get most of what I said, then don’t worry. You will understand this more clearly from the next lessons.
Project 2, Data Types
Unlike Python and like C/C++, Java is a statically typed language which means that each variable that you create can only be a one data type. There are also two types, primitive and non-primitive. Primitive types can only store values. But Non-Primitive data types come with their own methods which can help you manipulate them.
The following image is from this link:
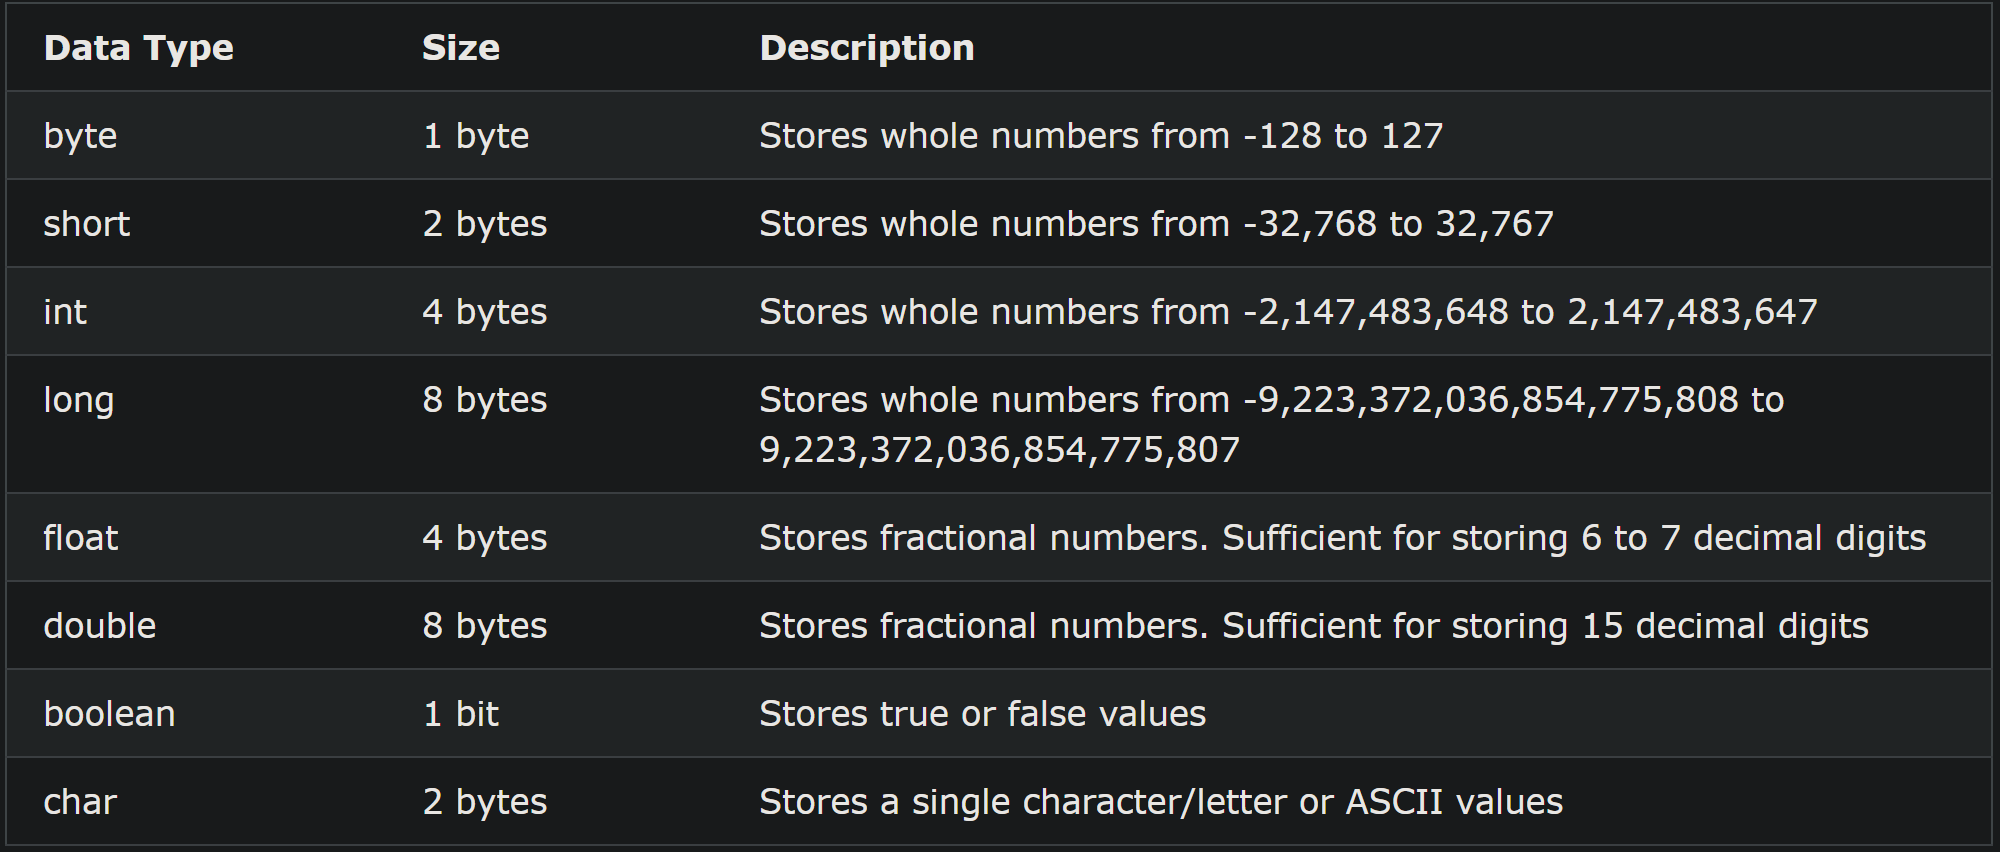
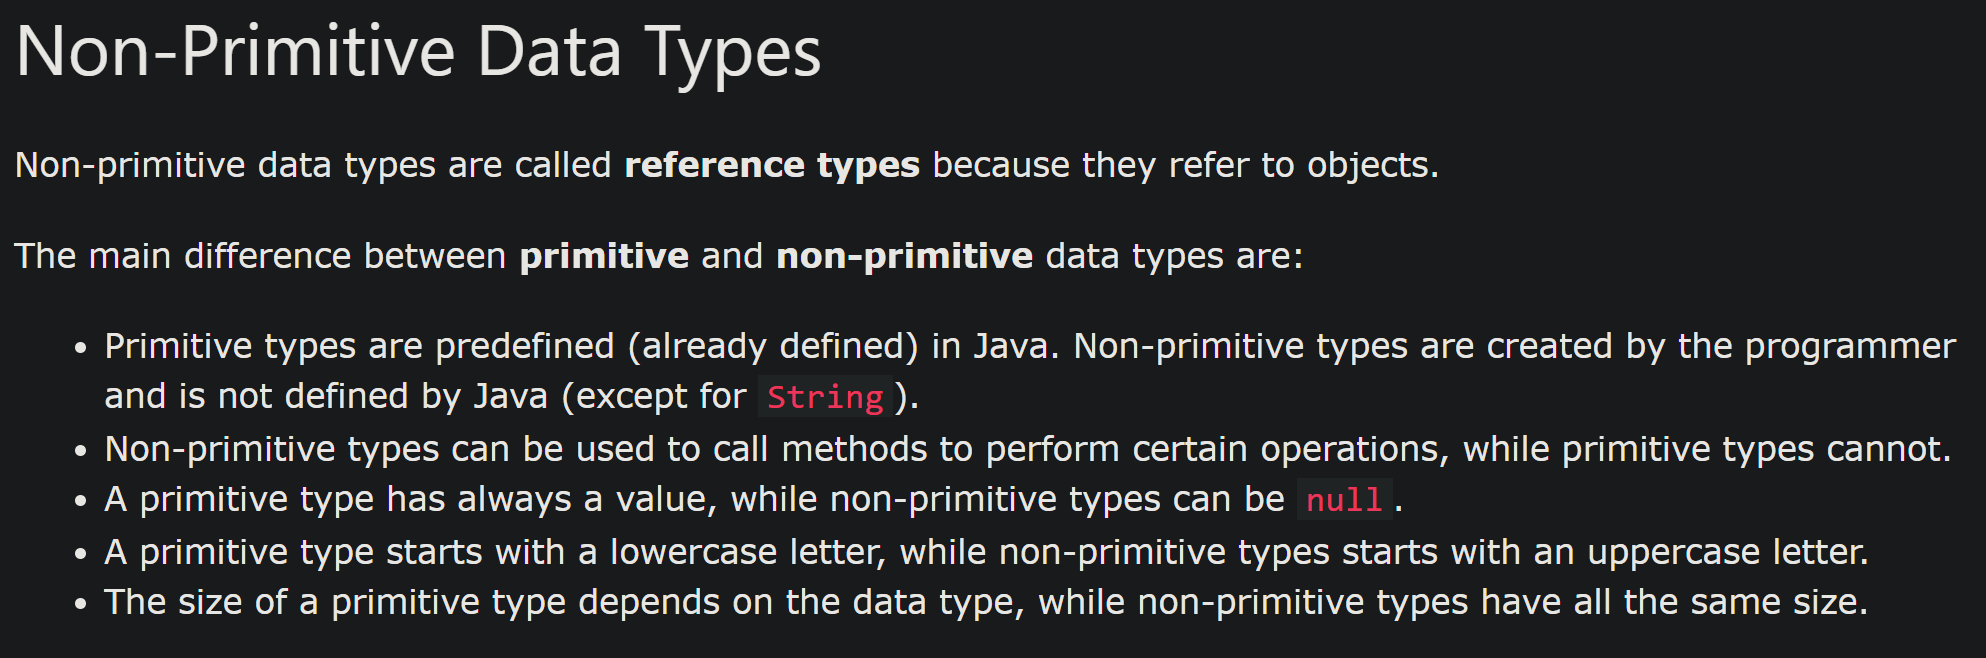
Non-Primitive Data Types include:
String - a data type which holds a series of characters
Arrays - Will be gone over later
Objects - Will be gone over later
Differences:
The way to declare these data types are like this:
public class Main{

  public static void main(String[] args) {

    String aString = "I am a string";
    int anInt = 100;
    double aDouble = 24.124124;
    byte aByte = 5;
    short aShort = 5000;
    long aLong = 653415267890;
    boolean aBoolean = true;
    char aChar = 'c';
    float aFloat = 4.5f;

  }

}
IMPORTANT NOTES:
- A String is encased in “s whereas chars are encased in ‘s. Make sure not to mess these up.
- A String is declared with a capital S, everything else is declared with a lowercase first letter.
And that is it for lesson 2. You have learned about data types!
Mini Lesson 1: Syntax, naming conventions and operators
- Everything inside an if/for/while/method/class has to be in a {}, indenting is optional but recommended.
- Class names are PascalCase and everything else is camelCase
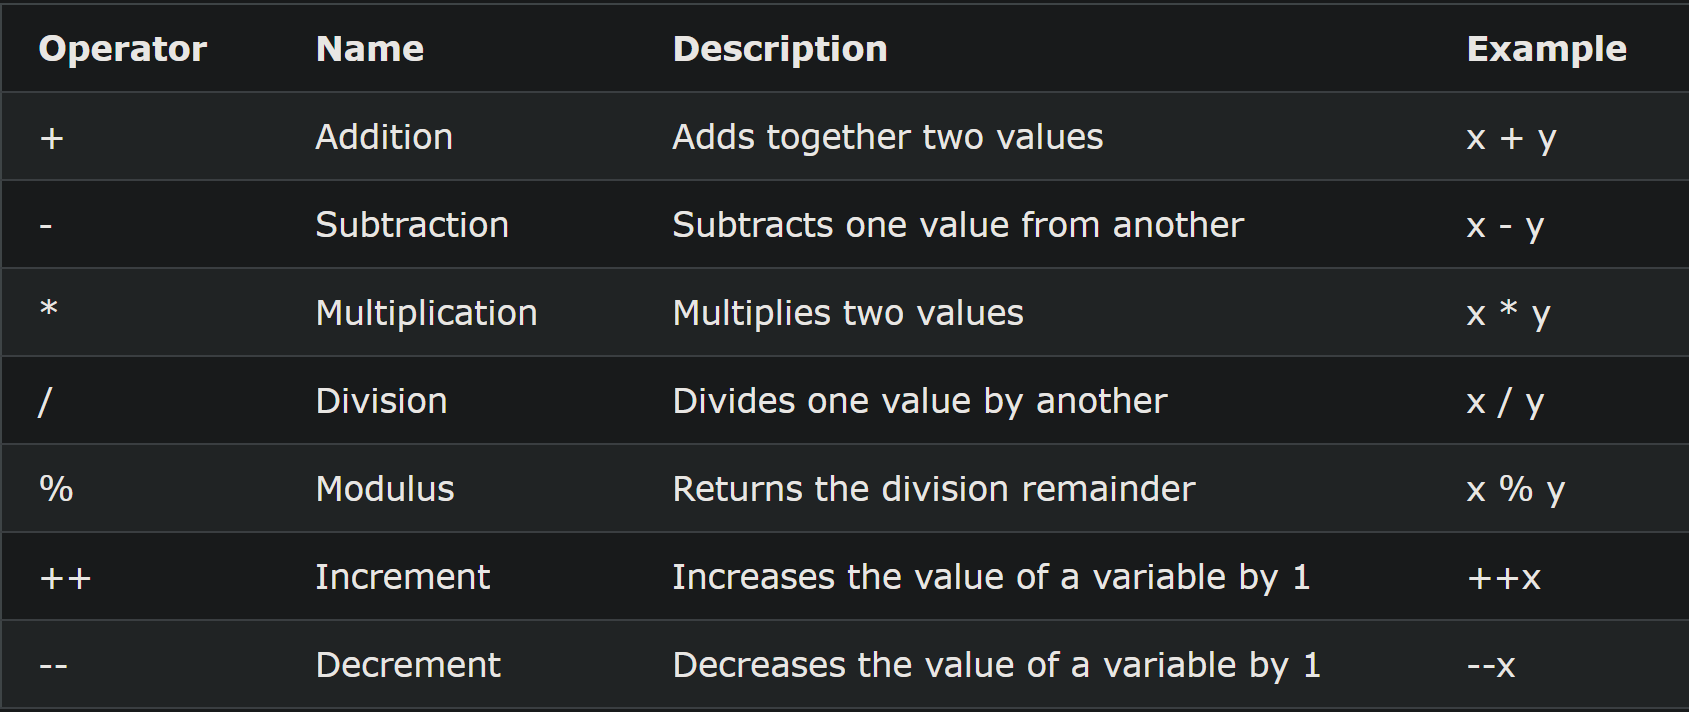
Available operators in Java are:
Project 4! If/else if/else
in this lesson we will be going over if, else if, and else statements.
Whatever is inside an if statement will run if the condition specified is true
Syntax:
int i = 5;
if(i == 5){
  System.out.println("i = 5");
}else if(i == 6){
  System.out.println("i = 6");
}else{
  System.out.println("i is not 5 or 6");
}
Java supports the usual logical conditions from math.
- > - Greater than
- < - Less than
- == Equals
- <= less than or equal
- >= greater than or equal
- != not equal
Note: Beginners often mix up the = operator and == operator. The == operator is used inside if statement conditions and booleans, but the = operator is used to assign values to variables.
That concludes the 4th lesson
Lesson 5: Loops
There are 3 available loops in java, in this lesson, we will be going over 2 of them.
for loops and while loops
A for loop does a specific action for a specific number if times.
for(int i = 0; i < 5; i++){
  System.out.println(i);
}
This creates an int called i and sets it to 0. Then it makes the max value it can be to 4. Then it states how much to increment after every time the loop finishes
Now while loops
while loops will run while a specified value is true
int i = 0;

while(i != 5){
  System.out.println(i);
  i++;
}
Make sure it is possible for the while to end!
There are also the keywords break and continue. You can put an if statement inside a loop, and if the is true, you can make it break or continue. A continue just means to skip all the code below it(That is till in the loop) then continue the loop
for(int i = 0; i < 5; i++){
  if(i == 3){
    continue;
  }
  System.out.println(i);
}
And it works for the while loop too EDIT: Look at this comment by @fuzzyastrocat for more info!
int i = 0;

while(i != 5){
  if(i == 3){
    continue;
  }
  System.out.println(i);
}
The break keyword just means that you will exit the loop immediately.
This is the end of lesson 5.
Lesson 6: Switch
A switch statement is like an if statement with a lot if else statements but cleaner.
The switch statement goes over possible values for a variable.
int i = 4;

switch(i){
  case 1:
    System.out.println("i is 1");
    break;
  case 2:
    System.out.println("i is 2");
    break;
  case 3:
    System.out.println("i is 3");
    break;
  case 4:
    System.out.println("i is 4");
    break;
  case 5:
    System.out.println("i is 5");
    break;
  default:
    System.out.println("It is not 1, 2, 3, 4, of 5);
}
Make sure to put a break after each one or else it will do what ever is in the default case as well.
That is the end of the switch lesson
Lesson 7: Arrays.
Arrays in java are like arrays in most other languages. They hold multiple values of the same type a. To declare an array, all you have to do is.
(insert type of array you want here)[] anArray = new (insert the type you put in the first ())[(type in the size of the array here)];
For example:
String[] stringArray = new String[5];
Now, we are creating a String array called stringArray and setting its size to 5.
Please know that once you have set it’s size, you cannot change it.
So how do you access things from an array?
Arrays are 0 based, which means that the first elements in an array is 0, so the last value in the string array would be at location 4.
But how do you access things in an array, and why would they be useful?
First, we will go over how to access elements in an array. You do them like so:
(Your array)[(int location)] = ....
So you could do
stringArray[3] = 5;
Simple!
But pretend you wanted to create a 100 int values which all hold the same value.
In most real world projects, you will have A LOT OF VARIABLES to manipulate. So you would most likely create an array to help manipulate it easier.
You could take the tedious and hard way and create 100 int variables, or you can take the easy way and create an array of ints.
int[] intArray = new int[100];
Ok that’s great, but how does that help me? I still have to go and assign them one by one.
Well not to worry, you can use a for loop(or while loop) to set values. For example, if you wanted to set every value in an array to 5, you could just do:
for(int i = 0; i < 100;i++){
  intArray[i] = 5;
}
Now, every single int in the array has the value of 5.
As you learned in this lesson, arrays can be used for manipulating a lot of a data type.
This is the end of the array lesson.
Lesson 8: methods
Those of you coming from procedural languages, you call this procedures.
Ok, so methods are behaviors. They are reusable pieces of code that you can use and call.
You can call methods like this: myMethod().
What this does is that we are calling a method named myMethod. But how do we create methods?
- First thing to know - a method can have a return type. That means that when you call a method, you get a value back. A method can return ANYTHING.
- Second thing to know - a method can return void (meaning they don’t return anything)
Here is an example of a method:
public static void myMethod(){
  System.out.println("The method myMethod() was called!");
}
Additional Notes:
- You can quit a void method early by doing something like: ```java
//somewhere in a method
int num = aNum*anotherNum;
if(num <= 0){ return; }
* ALL METHODS WITH RETURN TYPES MUST RETURN THAT TYPE:

You cannot have a method which returns an int but never returns an int anywhere in your code. That is one important rule you must follow. an example of a method returning a value:

```java

public static int addNumbers(int a, int b){
  return a+b;
}
Note: The keyword static will be gone over later. As we do not know about objects yet and we are doing everything in one class, just call it static for now so it works and does not throw an error.
Methods can also take arguments like in our add numbers example
Inside the () there can be variable. You could put things like (int a, String toPrint) and then you can use those variables in that method. These variables are called parameters.
It is also important to know that java is PASS BY VALUE
Read this article to learn more.
UNIT 2. Objects and Object Oriented Programming
Objects are one of the most important parts of java and object oriented principals is why games like Minecraft thrive with java. After this lesson, you will understand why notch going with java is the best thing that could happen to Minecraft (and you will learn how objects in java work)
Lesson 1 - Object Creation
Java is an Object Oriented Language, that pretty much means that java was optimized for that. But what does that mean and how does it work. Well, being object oriented means …, this is important make sure you remember this,
WHEN OBJECTS INTERACT WITH OTHER OBJECTS
That is the whole point about java! Objects contain different variables and methods which you can then use to interact with another object! But how do you make objects?
Well, first we have to look at how object are created. Here is an example:
Scanner s = new Scanner(System.in);
The structure for creating objects is like this:
[Object Name] nameForObject = new [Object Name]([Constructor args]);
SO what are we doing? Well first, we are creating a reference, kind of like a variable but to hold the object.
In our example, we say Scanner s, this is kind of like saying int i but instead of creating an int, we create a Scanner and give it the name s. Then after that, we say new Scanner(). This creates the object in the heap(the heap is where all objects in a java program live). Then we write System.in in the part that looks kind of like a method. That is constructor(Will be gone over later). Then finally we link the object and reference with an = sign. Then you have successfully created an object!
But now what? I created an object, but what is so great about it?
Well, objects in java are just like real world objects, they have methods and variables in the defining what they have and what they can do.
You can access this with the dot operator.
Example:
Scanner s = new Scanner(System.in);

System.out.println("Enter your name: ");
String name = scanner.nextLine();

System.out.println("Hi " + name + "!");
Here we are accessing one of the methods in scanner called nextLine() and we call it using the dot operator. you can also use its variables.
//In this example, pretend that the scanner class has a variable called delay in it. The scanner class does not have any variables but just pretend there is for now;

//somewhere in your code:

s.delay = 1;
That is how you access variables which are in an object. In the future, we will learn why this is a bad practice and use methods to get and set these objects in the future.
Lesson 2: Creating your own objects!
Now it is time for the fun part, we now how to access methods and variables in an object. Now it is time to create our own objects!
So for an object, what do we need to do?
Well, we need to create methods for behaviors and variables for possessions
Let’s create a dog object!
// This is inside a seperate file called Dog.java by the way
public class Dog{

  int weight = 0;
  int age = 0;

  String name = "";

  public void bark(){
    System.out.println(name + " says Bark, Bark!");
  }

}
All the code for an object lives in a class and that is how simple it is to make an object, that really is your very first object, as simple as that!
Now what we can do is:
public static void main(String[] args){

  Dog d = new Dog();
  //Remember what happens when an object is created
  d.weight = 30;
  d.age = 5;
  d.name= "Bob";

  System.our.println(d.weight + " " + d.age + " " + g.name);

  //method
  d.bark();

}
This will print
30 5 Bob
Bob says Bark, Bark!
Now you can create objects!
But there is more to come!
Let’s look at arrays. We will now create a Dog array
Dog[] dogs = new Dog[5];
You can create arrays with objects and iterate over them.
For example:
for(int i = 0; i < dogs.length;i++){
  dogs[i] = new Dog();

  dogs[i].age=i;
  dogs[i].weight=i*10;
  dogs[i].name = "Bob " + (i+1);

  dogs[i].bark();

}
Now instead of having to go through every dog and tediously write aDog.bark();, you can just iterate through it!
Lesson 3: Getters and Setters
We look back at our code from the last lesson. And I the author, have already pointed out two flaws in our design.
Flaws:
- OUR DATA IS PUBLIC!
name,age, andweight, they can all be changed with a simpled.age =…
But the what is so bad about that you ask. Well, what is to stop someone who is using your code to set the age to -1. Nothing can be aged negative years! We as good developers need to stop this from happening!
And there is another problem. what if you have a password variable in an object? anyone using the code can now access that password by saying theobject.password! There are some thing that we just do not want in another objects hands!
Also, it makes the code more organized and can make it easier to debug.
Flaw 2: Next lesson guys..
You must be thinking something like I wish there was something that could protect my data, and not have to do so much work..
It’s a bird! No, it’s a plane. No wait, It’s some…
Getters and setters
Wait what
Getters and setters, the correct name for them are accessors and mutators but anyways, what do these do?
They can set data and get data.
How? Using methods which return and methods which set
Let’s make our getters and setters. But to know how to do that, lets dive in to a quick little mini-lesson
Mini lesson 1: Access Modifiers
Unfortunately, I do not think that I would explain this very well, so here is a link to a website which can teach you a bit.
If you have any questions, feel free to ask me in the comments
OK! Back on track
Now that you know about access modifiers, we can get back to using getters and setters.
First, lets modify the dog class so that the variables are private(Meaning they can only be accessed by that same class)
public class Dog{

  private int weight = 0;
  private int age = 0;

  private String name = "";

  public void bark(){
    System.out.println(name + " says Bark, Bark!");
  }

}
We don’t need to mark the method private because we need to be able to access that method.
Now if we try to run the public static void main that we created before, we will get an error.
Now let’s create the getters and setters
public class Dog{

  private int weight = 0;
  private int age = 0;

  private String name = "";

  public void bark(){
    System.out.println(name + " says Bark, Bark!");
  }

  public int getWeight(){
    return weight;
  }

  public int getAge(){
    return age;
  }

  public String getName(){
    return name;
  }

  public void setAge(int newAge){
    if(newAge >= 0 && newAge <= 40){
      age = newAge;
    }else{
      age = 7;
    }
  }

  public void setWeight(int newWeight){
    if(newWeight >= 0 && newWeight <= 210){
      weight = newWeight;
    }else{
      weight = 80;
    }
  }

  public void setName(String newName){
    name = newName;
  }

}
Getters are conventionally named “get” + the name of the variable(in camel case of course)
Setters are also like that but with a “set” instead of a “get”
We do not care about who gets these variables so we will all we will do is return theVariable;
If there was sensitive info like a social security number for dogs, we can do something like…
public String getSocialSecurityNumber(Accessor a){

  //Pretend we created a class called Accessor for this example who represents the person who is trying to get the dogs sensitive

  if(a.getStatus().equals("Government Worker") || a.getStatus().equals("Owner")){
    return socialSecurityNumber;
  }else{
    return "INVALID ACCESSOR";
  }

}
Now we have getters and setters in our dog class!
Now lets change the class with public static void main
New Class:
public static void main(String[] args){

  Dog d = new Dog();
  d.setWeight(30);
  d.setAge(5);
  d.setName("Bob");

  System.our.println(d.getName + " " + d.getAge() + " " + d.getName());

  d.bark();

}
Now we are handling much better!
Exceeeeeeeeeeeeeeeeeeeeept for one place..
Now we are moving to fix that mistake.
Constructors! How to change 4 lines of code to 1!
For this entire time, we have been doing
Dog d = new Dog();
d.setName("Bob");
d.setWeight(50);
d.setAge(3);
But what is the problem with this?
Well, its tedious. You have to go and set each thing one by one. At first, it may not seem that bad, but what happens when you need to initialize many things. And you can FORGET to initialize a variable which means you could then end up with bad results when you run your program.
That is where Constructors come in!
Remember that when you create an object, you say new TheObject();
This creates a new object on the heap, and a constructor is what runs when you create an Object.
Lets start creating our own constructor for the Dog class.
Structure of Constructor
[access modifier] [class name]([parameters]){
  //code
}
Constructor for Dog:
public Dog(){

}
This is the default constructor, even if you don’t write a constructor in your class, it still will be there. Until you write a new Constructor.
Lets make the constructor useful
public Dog(String nameN, int weightN, int ageN){
  setName(nameN);
  setWeight(weightN);
  setAge(ageN);
}
Now lets change the Main class:
public static void main(String[] args){

  Dog d = new Dog("Bob", 30, 5);

  System.our.println(d.getName + " " + d.getAge() + " " + d.getName());

  d.bark();

}
Now our code went from 4 lines of code to 1.
This is much more efficient and can help in many ways in the future.
Review: A constructor is what runs when you create an object. Whatever statements you put in a constructor is what happens right when the object is created, you can also pass parameters into your code which can greatly reduce the size of your code to be more efficient
Overloading methods and Constructors
Methods and Constructors are great. But what if you want your class to be able to do multiple stuff. You want your reader to be able to read files or input from the user. That is where overloading methods and constructors come in.
Now pretend this. You are making a calculator program and you want to be able to do a calculation to some numbers. You could make there be one method called add fr adding numbers which takes in an int[] array which are all the numbers to add. But what if the user enters some doubles. When you try to call the add() method, you would get an error because an int array is not the same as a double array. This is where overloading methods come in.
You can have a method or constructor of the same name as long as each of them takes in different parameters.
Here is an example of some constructors for out dog class:
public class Dog{

  private String name;
  private int age;
  private int weight;

  public Dog(String nameN, int weightN, int ageN){
    setName(nameN);
    setWeight(weightN);
    setAge(ageN);
  }

  public Dog(String nameN){
    setName(nameN);
    setWeight(40);
    setAge(4);
  }

  //Pretend there are Getters and Setters and the Bark Method here


}
Now if we find a dog on the street, we can look at it’s collar and go “Oh, this dogs name is [Dog Name]”. But we would not know the weight right off the bat, so we instead create a Dog with just a name and then after you weigh it, take it to the vet, etc., you can then use the setWeight(), getWeight() methods with the dog and give it some attributes!
We can also do this with methods!
Pretend we were creating dogs in a laband you are naming it something like “dog#1” and “dog#2”. You could create a method called setName which takes an int, the number of the dog, then we can set the name of the dog to name = "dog#" + theInt;.
public void setName(String s){
  name = s;
}

public void setName(int i){
  name = "dog#" + i;
}
Break
Now you know about the basics of objects! Is that not great! Now we will be going in deeper in the pool of objects. Introducing…
Inheritance!!
The best way to reuse code and utilize java’s OOP principles! You will also learn how to answer to the question, Why Java is the best language for Minecraft?.Let’s dive right in!
Unit 3!
Lesson 1: The extends keywords
In a java program, you have objects which interact with other objects. But many times, you have a lot of objects which are related and have the same code or methods. For this unit, we will be using chess as the example.
inheritance. When an object inherits another object, it means that the object is one of the original objects. Example:
ObjectB extends ObjectA. That means that ObjectB is a(n) ObjectA. Chess pieces for example.
All pieces have a few variables or methods in common, we could create a class called Piece which has all the methods, a constructor and variables needed for a piece object.
Then we could have every chess piece extends that piece so that they would have all the behaviors of a normal piece, and then, we could add on more behaviors or modify the already existing behaviors to make the piece function correctly.
Now that we have finished the intro, lets start coding!
Let’s create a basic piece class.
class Piece{

  String location;

  //pretend we have a lot of other variables here

  public Piece(String loc){
    location = loc;
  }

  public void move(String newLocation){
    //code for moving a piece
  }

  //pretend we have a lot of other mthods here
}
Now lets create a Queen class which extends Piece.
class Queen extends Piece{

  //Now, the queen has every method a piece has!

  public Queen(String loc){
    super(loc);
  }

  //Constructors are a special case and will be gone over later.

  @Override
  public void move(String newLoc){
    //Overrides will also be covered later
  }

}
Now we can do:
Queen q = new Queen("d1");
//later..
q.move("f3");
No error will be thrown and this works perfectly.
So what is the extends keyword used for? It is used to show that one object inherits from another. The class which extends “the other class” has all the methods and variables of “the other class”.
Important Notes:
* THE MOST IMPORTANT NOTE! ONLY EXTEND AN OBJECT IF THE OBJECT PASSES THE IS A TEST!
Example:
Lets pretend we are creating a house object. Will you have the room objects extend house?
WELL NO. A ROOM IS NOT A HOUSE.
What about a bathtub in a bathroom? Will bathtub extend bathroom?
NO AS WELL!
A bathtub IS NOT a Bathroom!
What you can do is create a Room class then have every Room extend that room class. This works because a living room is a room!
But now you are asking, if a room cannot extend house, how does it play a part in the house?
Create a variable! It passes the HAS A test. A house HAS A room
A bathroom HAS A bathtub.
Create A NEW VARIABLE.
Lesson which one I Forgot: Overriding methods
Sometimes, you want your subclass(the class that inherits) to have different behavior from the super class. Or the super class cannot define a method because it does not make sense for it to know that behavior. This is where overriding methods come in.
A subclass can have the same method as a superclass(a method with the same name, parameter(s), and return type). But the subclass can override it in their class by creating that method in that class.
I probably explained it really bad so let me give you an example.
class Piece{

  public void move(String a, String b){
    //code
  }

}
Queen
class Queen extends Piece{

  @Override
  public void move(String a, String b){
    //The @Override isn't necessary but a good practice to have
    //Here we can ovveride the code with new code that makes it different from the piece class
  }

}
I probably explained this really bad and so to learn more, i suggest going to this link. You can ignore some parts of it but we will learn it.
Lesson 3: super()
Sometimes you want to call the superclass’s version of a method. If you do not create an overriding method, when you call it, it will do the superclasses version by default.
But what if you want to do the superclass’s version and your own? Well easy. In this lesson, we will learn about the call to super and how to use super with constructors
Lets start.
super(); is used when you want to call the superclasses version of a method or constructor.
a call to super is pretty simple.
@Override
public void randomMethod(){
  super();
}
Super automatically calls the superclasses version of the method you are currently in.
Adding parameters is easy too
@Override
public void randomMethod(int num){
  super(num);
}
Just pass in the parameter along.
Now there are some thing important to know when using super.
- Calling
super()MUST BE THE FIRST LINE IN THE METHOD
You cannot call it in the middle or as the last line. For example, you cannot do:
@Override
public void randomMethod(int num){
  System.out.println("This will not compile");
  super(num);
}
This will result in an error and your program won’t run.
Now onto the next part of our lesson, Constructors
You probably have seen errors when you are working with inheritance and have encountered warning messages with the constructor
This is because constructors are not inherited
You need to put it in yourself using super usually
class Example extends cool{

  public Example(int i, int j, String c){
    super(i, j, c);
  }

}
Then the constructor will work.
Also, the same as methods, you cannot put anything above the methods but you can put code below.
Note: To get this tutorial out faster(It has been 2 months since I started) and even my knowledge about objects and inheritance is fuzzy, this unit will end, there are many online sources to continue learning. I will go on to a more fun unit now
Learn about two important topics: static && polymorphism
Unit 4 - Standard Libraries
Ok, after deciding to cut the 3th unit short, I will get to the most fun part about java, In-Built Libraries. A massive collection of useful classes which you can use to do many things.
How do the standard libraries work?
To import a class(or any class not in the same package), you need to import it.
C/C++ devs, import is NOT the same as include,
When you import classes from the standard library, your code will not become more slower, you can import every class in java and still have a fast program. Java does not compile the classes you import. Remember, classes are only blueprints for an object. the more objects you have in a program, the program will become slower. But importing every class you possibly
The format to import classes is:
import [package name].[class name];
So for example:
import java.util.Scanner;
In this case, the package is java.util and the class name is Scanner.
I will not go over packages in this tutorial. Go here to learn more about packages.
Now let us get into some of the most useful classes in the standard library..
java.util
The java.util library is the most useful class for beginners. It contains many utility classes which can be used to your advantage. In this section, we will look at 3 classes:
- Scanner
- Lists
- Random
java.util.Scanner
The Scanner object can be used to get input from the user. You can use it like this.
Scanner scanner = new Scanner(System.in);
System.in is an input stream. It needs to now where the input is coming from.
The most useful methods are this:
scanner.nextLine();
scanner.nextInt();
There are many more methods though which I will not cover. These are just the most common ones.
Each of these methods returns a value.
The first one returns a String and the second one returns a int.
You can prompt users like this:
System.out.print("Enter name: ");
String name = scanner.nextLine();
System.out.print("Enter age: ");
int age = scanner.nextInt();

System.out.println(name + " is " + age + " years old!");
This is a basic program with scanner. But for you python people(And pretty much anyone else), you can tell this is way to many lines for such a small program. For this, I recommend using this method:
//Enter static if you wanna make this static
public String input(Scanner s, String prompt){
  System.out.print(prompt);
  return scanner.nextLine();
}
by calling input(s, "What is your name");
You can get back a string and use that to your liking. If you want a integer or double, you can cast it. learn about casting here.
Lists
Arrays in java are not dynamic. Once you set the size of the array, it cannot become bigger. What happens when you do not know how big the array is going to be? That is where lists come in:
Their structure:
ArrayList<Integer> list = new ArrayList<Integer>();
Most of it looks the same, except for the <>. These are called generics, these are ways you can specify what the list holds, that means that this can hold ints, doubles, or any class.
Note, there are differences with declaring lists, when declaring lists, you have to spell out the full name of the class. That means generics change to:
IntegerDoubleString
Pretty much the full name of the class
Now what can you do with lists?
You can, add and remove values, here is an example:
import java.util.ArrayList;

public class Main{

  public static void main(String[] args){

    ArrayList<Integer> list = new ArrayList<Integer>();

    list.add(5); // Add adds a value to the end of the list
    list.add(7);
    list.add(5);

    list.remove(2); //Removes the value at index 2

    list.add(1, 4); // adds 4 to index 1

    list.clear(); // clears the ArrayList

    list.size(); // returns the size of the array, useful in loops

    list.get(2); // returns value at index 2

    list.set(0, 5); // sets value at index 0 to 5

  }

}
It is important to know Array List’s are 0 based
And that is all you need to know about Array Lists!
Now we can move onto…
java.util.Random
This class can help us generate random numbers.
Here is how it works:
Random r = new Random();

int randomNumber = r.nextInt(100);
//returns a random number 0 through 99(does not include 100)
That is pretty much all you need to get started. Here is the link to the doc: Click here
java.io
This set of libraries help you do file io, a really useful tool to help you manipulate files, we will be going over FileWriter and how to read files
java.io.File
The java.io.File class is what you need to manipulate Files, it has a set of methods and can be used with many other classes, let’s start with the basics.
//File f = new File("YourFile.fileextension");

File f = new File("test.txt");

//Now we can use methods in the file class

//f.mkdir();
// turns this file into a directory

//f.delete();
//deletes your file

String s = f.getAbsolutePath();

//gets the path to the file

//When we instantiate a File, if it does not already exist, it will be created
This is cool and all, but what we really want to do is manipulate this.
If you want more info on files, go here
Scanner with Files
We have already seen Scanner’s, but did you know they can be used with files? Simple! Let me explain how
Scanner s = new Scanner(new File("example.txt"));

String s = "";

while(s.hasNextLine()){

    //s.hasNextLine() is a method that checks if there is an available line to read

    s += s.nextLine();
}
That simple! That is all you have to do to read from a File! Now you can manipulate Strings and it is all really cool.
FileWriter
In this lesson, we will be going over FileWriter, it is a class which helps you write to files.
Here is how it works:
FileWriter fw = new FileWriter(new File("example/txt"));

fw.write("This will be written\n");
fw.write("Remember to use ansi escape sequence to add an extra line or else all your info will be on the same line")
AND THAT IS IT. This is all you need to start working with files! To be honest, I think it is much easier than in other languages.
javax.swing
I have a series of java swing tutorials, a great place to go after you understand tha basics!:
Bonus lesson - Lambda Expressions- By @AstOwOlfo
Preface
Note: This uses threads, a concept not introduced in this tutorial. If you are interested, go here to learn
Lambda expressions can be best described as a method with no name. Like a method it can take in parameters and return a value. In this section of the article I will be discussing the correct way to use them and show some “real-world” implementations of the lambda expression.
If you’ve made use of Node.js/JavaScript before, you will find that this almost identical to an arrow-function.
Any lambda expression would start like this (), inside these parentheses you can define the parameters you wish to put into the lambda expression, however this can be left blank.
Next, you would add the arrow as follows () ->, now we have our foundation for the complete lambda expression.
I find it important to note at this time that a lambda expression can only define finalized variables or set the finalized value for a variable. There are many ways of getting around this; namely Atomic Variables, however, I will discuss this later on in the article.
So, with this base we can go two different ways, we can create an in-line lambda expression or go for a multi-line approach.
Let’s start with a multi-line lambda expression:
() -> {
    if (msg == "hi") {
        System.out.println("hewwWoo! ;3");
    } else {
        System.out.print("rahhhhhHHhh!!!!1!");
    }
}
In this example we can see that the the expression can run through multiple lines before returning to the body of the method it’s contained within. But let’s say you want to run a check to get a quick value for one of your methods? Lambda expressions can make tidy work of that, let’s take a look.
Here’s an example of an in-line lambda expression:
bool winLose = () -> checkIfWinner(long user.getLong("id")) && user.getString("team").equals("astolfo");
Rather than running an if/else statement we saved multiple lines by condensing this into a singular lambda expression. This is the art of using lambda expressions in your code.
Now you might be wondering about my previous comment regarding the bypass for the use of finalized variables in a lambda expression. Well don’t fret, I’ll be talking all about an excellent tool that I use myself to get around this unfortunate limitation!
Atomic Variables
Preface
An Atomic Variable can be thought of as a wrapper for non-atomic variables such as (non)primitive types.
The intended purpose of them was to ensure the security of your data in a multi-threaded operation, as during such operations the thread typically stores your regular variables in thread cache and if they should be updated in another thread another thread will not account for this.
In contrast, an atomic variable will write directly to memory and the thread will be able to have an accurate definition of the method at all times as whenever it is used, it will use the value stored in memory rather than in thread cache.
Now, theory is fine and all but how can we make use of an Atomic Variable in a practical sense? Simple.
AtomicInteger SpookyBoi = new AtomicInteger(0);
SpookyBoi.getAndAdd(1);
// we define the variable and set it to 0, next we add 1 to it's value

final CyclicBarrier barrier = new CyclicBarrier(3);

Thread thread1 = new Thread() {
    public void run() {
        int ghost = SpookyBoi.get();
        System.out.println("1. "+ghost);

        SpookyBoi.getAndAdd(2);
    }
}

Thread thread2 = new Thread() {
    public void run() {
        int ghost = SpookyBoi.get();
        System.out.println("2. "+ghost);

        SpookyBoi.getAndAdd(4);
    }
}
// we create the threads we want to use and instill a CyclicBarrier to prevent them from running until needed

thread1.start();
thread2.start();
// the threads are queued to start

barrier.await();
// the CyclicBarrier starts both threads simultaneously, however, this is not always precise, so do not use this technique in a production build

System.out.println(SpookyBoi.get());
As we can see in this scenario we created two threads and then ran them concurrently. Normally, there would have been a risk that our final value for SpookyBoi would have been incorrect, however, thanks to the AtomicInteger data type that we used this was not a concern for us.
This is the art of ensuring stability with concurrency.
Now, you may remember I discussed the idea of using Atomic Variables to bypass the variable limitations with lambda expressions. Let me show you how it’s done.
AtomicReference<String> kawaii = AtomicReference<>();
kawaii.set("cute");
// we define the new atomic reference with the string property and set it's value

String Astolfo = () -> {
    kawaii.set("setting this for no reason");
    if (astolfo.get("emotion").equals("happy")) {
      kawaii.set(":3");
    } else {
      kawaii.set(";(");
    }
    return kawaii.get();
}

if (Astolfo.equals(":3")) System.out.println("uuuuuuuwu");
As you can see, we were able to redefine the variable multiple times inside the lambda expression without throwing any exceptions. The use of Atomic Variables in a lambda expression is a valuable tool that is not to be underestimated.
This is the art of using atomic variables in a lambda expression.
Conclusion + Credits
This was a project which took about 2 months to make
Credits
-
I got A TON of help from @CodeLongAndPros with his reviewing, Thanks a lot :D
-
The last topic on lambda expressions is by @AstOwOlfo and helped with some reviewing :3
-
I also got some help near the end from @dakshg with reviewing and adding stuff :D (I know him irl)
-
And finally @lightningrock has fixed puncuation, markdown and stuff.
I know this may be a bad tutorial for some people because of the typing errors and general Messiness and I have not gone around to correcting it. If this gets enough support(upvotes), then I might go back and fix it. I also cut the OOP lesson short because I did not have the heart to continue doing it and it is extremely complicated and I am sure you can find many sources online.
I hope you all learned a lot in this tutorial!
Have a good day, and happy coding! ;)
**Also, I do not think I ask this a lot but because I think I put a lot of effort into this, I will ask this:
PLEASE UPVOTE IF YOU ENJOYED. IT REALLY MOTIVATES ME TO CONTINUE WORKING ON THESE KINDS OF THINGS.
NO THIS IS NOT SOME KIND OF GARBAGE 100 line tutorial that teaches you nothing. THIS IS AT LEAST 1400 lines and 2 1/2 months of work!**
Other notes:
-
I will have a bash tutorial coming up probably. I made one on windows command prompt but that’s for windows. Repl uses bash so bash it is.
-
Feel free to fork the attached repl and make changes to it. See Edit 2
I have made some errors in grammar, punctuation, and sometimes, I sometimes make the size of the headers incorrect like make a lesson in a unit have##instead of###